Sunday, December 1, 2013

Making a Non-Denominational Holiday Card

 I had to think of something that the kids could put on the front of a holiday card that would be sent to someone in which they would not know what their faith of religious sect is. So In asking for feedback I was told to use a candle. I agreed, a candle I thought was perfect and fairly easy to draw as well. After all candles convey light during the dark time of year, they provide heat and light and people are rarely offended by them.

The after school students an I are participating in the Holiday Mail for Heroes project which send mail to soldiers who are away from their families for the holidays.

I have made a link above to the projects main page if you would like to get involved.
below are the guidelines.

Card Guidelines:


Every card received will be screened for hazardous materials and then reviewed by Red Cross volunteers working around the country.
Please observe the following guidelines to ensure a quick reviewing process:

  • Ensure that all cards are signed.
  • Use generic salutations such as “Dear Service Member.” Cards addressed to specific individuals can not be delivered through this program.
  • Only cards are being accepted. Do not send or include letters.
  • Do not include email or home addresses on the cards: the program is not meant to foster pen pal relationships.
  • Do not include inserts of any kind, including photos: these items will be removed during the reviewing process.
  • Please refrain from choosing cards with glitter or using loose glitter as it can aggravate health issues of ill and injured warriors.
  • If you are mailing a large quantity of cards, please bundle them and place them in large mailing envelopes or flat rate postal shipping boxes. Each card does not need its own envelope, as envelopes will be removed from all cards before distribution.
All holiday greetings should be addressed and sent to:

Holiday Mail for Heroes
P.O. Box 5456
Capitol Heights, MD 20791-5456

The deadline for having cards to the P.O. Box is December 6th.
Holiday cards received after this date cannot be guaranteed delivery.

Bitten by the rubber band bug

So working with kids I have seen an awful lot of the stretchy rubber band bracelets. I myself became intrigued by this new fashion phenomenon. I had also recently decided I wanted to learn crochet so I already had purchased some various sizes of crochet hooks. So I got some little elastic hair bands and experimented with those first. Then I learned from my mom how to use the band on a four peg spool knitter.

I used YouTube tutorials for making a dragon scale bracelet on a fork. Then I caved in,I bought myself a loom for the more advanced bracelets.


I have totally been bitten by the rubber band "bug". I love it ! Until recently I have been making the bracelets for the kids I work with in the after school program.I have been  giving them bracelets as incentive. we have also been making them as projects once a week. I have just started to post rubber band related items to my etsy shops.  I combined my love of making tassels with them and made some earrings for my tribal trends shop.  
This weekend I also learned three new variations on the "triple single" rainbow loom bracelet. I will begin posting some of my bracelets and the new charms I made with polymer clay for the bracelets on my sculptresslink etsy shop today.

Monday, November 25, 2013

Tons more turkeys


Yes, still more installments of turkey crafting madness. We are planning a Thanksgiving party for my after school program so I have made a "Pin the Gobble on the Turkey Game". I drew the turkey with markers on plain old copy paper. I then folded a sheet of red construction paper multiple times to get a multiple cut shape to make 40 "gobbles" for the game.
Another project that was recommend for my after school program is the potato turkey,you can also use a pine cone. Here I used a crumpled  piece of constrctuion paper as getting 40 potatoes or pinecones can be pricy and time consuming.


Saturday, November 23, 2013

Tons of Turkeys

With Thanksgiving right around the corner. The elementary school age teachers of America unite on the craft frontier to make, turkeys. Lots, and lots, of craft project turkeys. So here are three of the turkey projects I have been working on.  One is the turkey wreath. This is made with paper plates, construction paper and glue. I found it a little advanced for the kindergarten kids in my after school program but they could do it with some one on one assistance.


The second one that is lots of fun is the paper cup turkey, which is good for all age groups. You will need: paper bathroom cups, brown paint (tempera or acrylic),
 google eyes, construction paper, scissors, glue, cotton balls or craft pompoms and construction paper in brown and yellow. If you are doing this with a group I highly recommend precutting the construction paper pieces.


Monday, November 18, 2013

More then a coloring book


 I came across this Fall leaves coloring book in the check out line at the grocery store the other day I was draw to it like a moth to a flame. Like any other good teacher trying to get the most for their money I of course made xerox copies of the pages for the kids to color on. I have used it for my after school program and recently as a pen and ink study and a collage mixed media material for the charter school I teach at.This is book would also be great for science lessons and for learning plant identification.


Monday, November 11, 2013

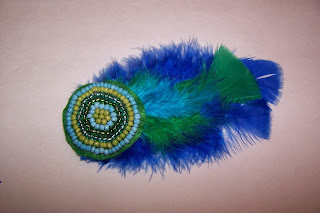
Beaded medaillion hair clips

 I make these hair clips. Their are for tribal belly dance costuming but could be worn for other occasions too.
 these clips are for sale on my tribal trends etsy shop. I can also custom make them according to color preference too.

I am also selling them in the Rochester NY area at a local shop called Now and Zen.


Pen and ink leaf drawings

I'm using my day off today to prep a lesson for the charter school I will be teaching at this Friday. Students will be using India Ink and a quill (feather) to draw with the ink. I use a disposable container to put the ink, since it stains. I also put down newsprint on my work surface. Students will start with pen and ink techniques making a value strip that practices the techniques going to dark.

Then using pressed natural leaves students will draw a contour outline of the leaf and use the pen and ink techniques to draw the leaf. 


Mixed media collage

I have been teaching some lessons at a small charter school. Our lessons thus far have focused on shading and using light to dark colors with smooth transitions. These collages use construction paper and scrap vinyl sign adhesive.We used oil pastels and  focused on blending.
We also discussed organic shape, geometric shape and pattern. 

Monday, October 28, 2013

Making a kumihimo disk braider


 I learned this from a fantastic fibers artist Mimi Smith. Mimi is fantastic with all things fiber!
I often do this with my after school kids and they love it. I also use the seven strand braids in making my silk flower and shells hair falls that I sell on my tribaltrends etsy page.

Step 1 Is finding a cardboard box to make your disk from. I have found that Macaroni and cheese boxes are just the right size for this. Cut out a square about 4 inches by 4 inches. Its about half the size of the large box panel if using the mac and cheese box.


Step 2 Cut a trianglar wedge out of the corners of the box. You should be left with a octagon or "stop sign" shape.


Step 3 Cut a small slit about a 1/2 inch long on each side of the disk.Carefully point your scissors through the middle of the disk and cut a small hole(slightly less then an inch)


Step 4 Cut seven long lengths of yarn. Keep in mind that the braid will but slightly shorter then the lengths of yarn your cut.

Step 4 Tie the yarn lengths together in a knot about 1-2 inches away from the yarn ends. Put the knot through the center hole and thread the yarn through all but one of the slots you cut.Turn the open slot facing up. Count down to the third string away from the open slot. Pull that length of yarn out and flip it over to the now open slot. 


Step5 Turn the disk to the right so that the new open slot is facing up. Count down to the thrid string from that open slot again and flip it over to the now open slot. Continue this until your braid reaches a desired length and knot the end off. The braid comes down through the middle of the disk.


These braids will make great tassel cords, bracelets,hanging cords, etc.kids can walk while they do this, You can watch a movie while you do this, great for a kids to do on a car trip or I am sure you can think of many other great ways to use this!Suitable for all ages!

Pumpkin prints


With Halloween and Thanksgiving upon us I am getting inspired by all things pumpkin!
This is a simple paint printing project using the caps of a gallon or half gallon milk jug.

You will need:
 White or other light colored paper
Orange paint or red and yellow to mix
 A  tray or other surface to put the paint on
Markers or colored pencils in green, black, orange and brown.

Step 1 Dip the cap slightly into the orange paint and print an arrangement or circles on the paper.Let the printed circles dry.


Step 3 Go into the dry circles with marker of pencils and either draw Jack o lantern faces or pumpkin ribs.


Step 4 If you want to make the project more elborate cut the pumpkins out and make an scene with them on another sheet of paper.

Monday, October 21, 2013

Contour line hand drawing

This was a sub assignment I was given to do last Friday with groups of Third  and fourth graders.To start you trace your hands in pencil.Then you start at the left side of the pages and make parallel lines. When the lines touch the hands they curve. Be careful to hold your sharpie marker upright so that the lines don't get to thick and accidentally touch.You can also do this with just one hand traced.


Tuesday, October 15, 2013

Apple tree collage

This a quickie mixed media  collage project. You need brown construction paper, red construction paper, light use paper, pencil, green crayon or marker and, a glue stick.Trace your hand with the pencil into the brown paper. Then cut out brown paper"tree" glue down with a glue stick and draw the green leaves in. To cut several apples at once fold the red construction paper into fours and cut through the multiple layers at once. Making the apple shape is similar to cutting a heart shape and then cutting off the bottom.

Thursday, September 5, 2013

Magic mushrooms

I worked in the clay studio this summer making a fairy village complete with three fairy houses and over thirty mushrooms.Two of the houses and my fairy are on display at the Memorial Art Gallery's Creative Workshop as part of the faculty show.I have been calling them "Magic " Mushrooms or mushies. They are made from a chocolate colored clay with colored slips painted on them.

Friday, June 7, 2013

Mini sketch book

This is a folded 8 x 10 inch piece of paper I folded it into 6 equal sections then drew items in the room one item in each box. I used pencil and colored pencils.rated
This is a great warm up or drill for high school or young adult students. Since little time is spent on any one item it has a fair rate of successful and possible unsuccessful drawings. It's a low frustration project so no one feels majorly defeated or frustrated with it.


Thursday, May 23, 2013

Ice Cream sundaes

 This was a three day sub assignment for middle school classes. I showed students how to draw the outline shape of the sundae cup and the ice cream then let them create their own sundaes with a choice of their topping and favors. This is outlined first drawn in pencil then, outlined in black permanent markers then colored with oil pastel.

Wednesday, May 15, 2013

Craft paper book

This was made from the leftover packaging paper from a box of speedy cut. I am drawing on each piece and will bind them into a book when I am done.


Monday, May 13, 2013

Cardboard tube paintings

Cardboard tube painting. I read about this years ago in a preschool art book. I have found it to be very successful for 5 to 9 year colds as well. This is a cardboard tube from paper towel dipped rolled into paint. Then a smaller tube dipped into another color of paint at the ends. Kids also added detail with their own brushes.


Tuesday, May 7, 2013

Beautiful beads


 I was gifted with some new beads recently by a friend and have been working on  new bead work necklaces and earrings for my tribaltrends.etsy shop. I have also been doing bead work with the kids from the after school kids.


Sunday, March 31, 2013

 This is another project that I did with my after school program kids.
We spent two days on it. I drew some egg shapes on 8x10 inch construction paper for the kids to cut out. We spent the first day cutting out the egg shapes and choosing colors of paper we wanted then we made our stamps.
The stamps are made out of cut pieces of craft foam which we glued with white glue onto  precut pieces cardboard that we cut from old boxes.
On the second day when the glue on the stamp had dried we used a craft grade paint brush and brushed paint on the the stamp and printed  the egg by gently pressing on the back side on the cardboard stamp.

This stamp was used on the egg below.


Friday, March 22, 2013

Kandisky concentric circles


 This is a  very well know painting. Many, many art teachers have used this as a lesson plan base.


This was a two day sub assignment.I created variations on it to make the project more or less challenging depending on the age group.Students also got to choose their level of challenge.

Kindergarten students used took rectangluar drawing paperand we folded it together as a class step by step so that the paper had 4 sections. Then students drew one large circle and two smaller circles inside it. It will look at little like four small a targets. Students used a pencil to draw the circles first, then a sharpie then the last step was to color in with artstix the background and within the rings of the circle.


 For older grade students(2nd) we folded the paper into 8 sections and used watercolor paints for older classes.All classes got to choose their challenge level with the choice of how many rings to add to each circle pattern.


Saturday, March 2, 2013

Happy birthday Dr. Suess


Hundreds of school children celebrated the "birthday" of Dr. Suess today and Read Across America week.So I thought why not bring the fun to art class too? After all the art of Suess was just as important as the text. So in honor of these events we designed and made drawings of Birthday cakes for Dr. Suess.


After a day of drawing those cakes I thought today I would try my hand at making some Dr. Suess birthday cupcakes of my own.
I  used chocolate cake mix, white frosting  I mixed with some blue food coloring for fish cup cakes.
 I also mixed the white frosting with some green food coloring for the "Green Eggs and Ham" cupcakes.

I got red Swedish fish and sandwiched them with white frosting for cat hats and red shoelace licorice for cat whiskers.  I used some left over gel icing for all other details.